We recently summarized the most common industrial vibrator failure modes that we see. In our 35+ years of working with heavy duty industrial vibrators, improper mounting is consistently the single leading root cause of industrial vibrator failure. Because improper mounting has a tendency to cause a wide range of issues with vibratory equipment, our customers are often surprised to learn that an error in the vibrator installation process is the true culprit. To help you avoid this pain, let’s dive into more detail on how to properly mount your rotary electric industrial vibrator:
Mounting Base – Rigid and Flat
Rigid and flat, rigid and flat, rigid and flat.
The key to properly installing an industrial vibrator is to ensure the base you’re mounting the vibrator on is sufficiently rigid and flat. Here’s why:
Deflection
The mounting structure must be sufficiently rigid such that the out of balance forces created by the rotary electric vibrator don’t cause the structure to deflect more than 0.007” from peak-to-peak. Deflection, or bending, of the structure creates relative movement of the mating surfaces that are securing the vibrator to the equipment. Too much deflection will eventually lead to joint separation and loosening of bolts, as the vibrator will begin to essentially pull itself away from the mounting base each time the out of balance weights are opposed from the vibrator base.
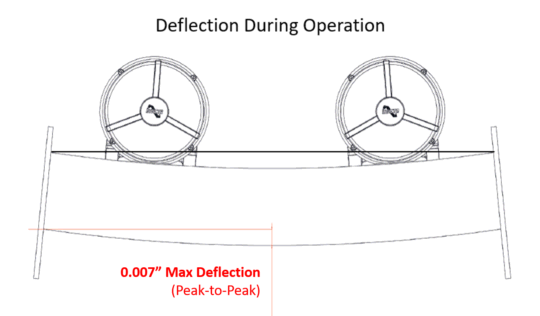
Keep in mind that the maximum allowable peak-to-peak deflection of 0.007” is not detectable to the eye. To help builders of vibratory equipment get this right, we offer finite element analysis (FEA) services free of charge. When performing FEA, our team of product experts and engineers work hand-in-hand with the customer’s design/engineering team to model the forces generated by the vibrator(s) to ensure the vibratory equipment is designed to allow less than 0.007” deflection.
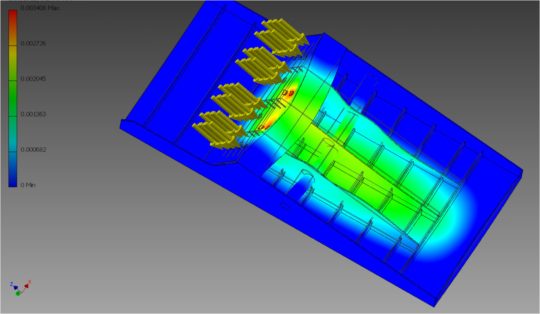
Finite Element Analysis
Base Flatness
In addition to the mounting base being sufficiently rigid, it should also be completely flat. Once again, having a flat base is critical in avoiding joint separation. We therefore recommend all bolting surfaces be machined to ensure complete flatness to within .007”. Lastly, all debris or paint scale should be removed from the mounting surface prior to vibrator installation.
Securing the Vibrator to the Base
Once have a completely flat surface, you are now ready to install the vibrator.
Using equal grade bolts, nuts, and hardened flat washers (Imperial Grade 5 or 8; Metric Grade 8.8 or 10.9) the vibrator pedestals should be brought into contact with the mounting base. It is most effective to have the bolt enter from underneath the mounting base using a hardened flat washer between the bolt head and underside surface of the mounting base.
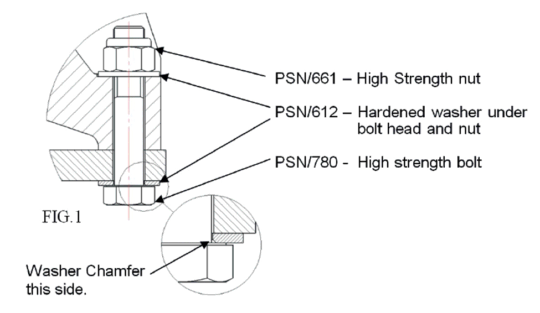
When applying the hardened flat washer, ensure that it fits cleanly in the spot-faced area of the mounting foot – it is critical that the entire O/D of the washer sits in this machined spot-faced area. Then apply your high strength nut and, using a calibrated torque wrench, torque on the nut to the appropriate value as outlined in the table below (also in the Hindon/Invicta L-Series O&M Manual).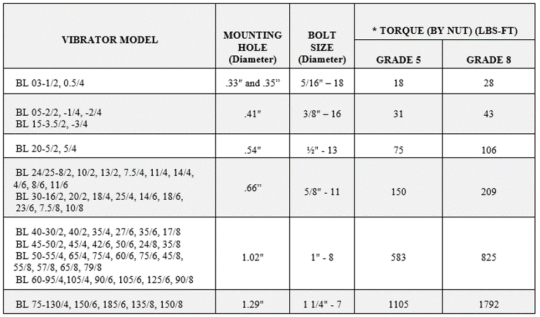
The torque figures listed in the above table are for non-lubricated, unplated, carbon steel fasteners. Plated or lubricated bolts will have different coefficient of friction and will therefore require different torque values for tightening. Bolts should be long enough that at least two full threads protrude from the nut when tightened.
Vibrator “Run-In”
After operating the vibrator for ~30 minutes, turn off the vibrator and check the mounting hardware to ensure it has maintained its torque value. We also recommend checking torque after approximately four hours of operation, after seven days, and then after one month. We also recommend including this torque check in your regular preventative maintenance schedule, as running a heavy duty industrial electric vibrator with loosening hardware, even a short period of time, can cause serious damage to the vibrator and your vibratory equipment.